Recipe Links
Basil Oglio Fra Diavlo Black Pepper and Fennel Shortbread Crackers Bleu Bacon and Italian Burgers Blueberry Almond Crumble Pie Braised Beef Short Ribs Breakfast Sausage Butter Pecan Shortbread Cookies Buttermilk Pancakes California Grilled Artichokes Capressa Fra Diavlo Cherry Garcia Icecream Cherry Sangria Chicken and Polenta Chicken Cacciatore Chicken Vegetable Soup with Broccoli Rabe Chocolate Cake with Chocolate Ganache Frosting Chocolate Sparkle Cookies Christmas Shortbreads Classic Hummus Coconut Cake Coq Au Vin Wine Braised Chicken Cranberry Orange Crumb Cake Cream Corn and Lima Bean Succotash Devishly Chewy Brownies Eggplant Parmesan Fetticini Alfredo with Bacon and Peas Fusilli a la Vodka Sauce Ginger Chocolate Spice Cookies Gnocci with Broccoli Rabe and Sausange Gramma Daly's Cole Slaw Grilled Beef Tenderloin with Blue Cheese Butter Grilled Swordfish Hazelnut Biscotti Cookies Heavenly Blondies Homemade Italian Sausage Homemade Sauerkraut Hot Artichoke Dip Italian Meatballs Lasagna Bolonase with Ragu Sauce Little Sister's BBQ Ribs Molten Chocolate Cake Olio fra diavlo pasta salad Pumpkin Gingerbread Cake Quiche (Sans the Lorraine) Red Velvet Cake Seafood Francaise Shaved Brussel Spouts & Polenta Cake Slow Cooker Thai Pork and Coconut Rice South Florida Fish Stew Spagetti ala Olio Aglio and Pepperoncino Spiced Pear and Cranberry Chutney Steak Braciole Sunday Tomato Sauce Sweet Potato Corned Beef Hash Swordfish Oreganade Teriyaki Pork Tenderloin and Spicy Thai Peanut Sauce The White House Maryland Crab Cakes Tomato Bisque with Chichen and Rice Turkey Paprikash Soup Walnut Shortbread Christmas Cookies White Bean Pasta Fagioli
Saturday
Mar022013

Coming this Summer . . .

Now that I finally found some inspiration for getting back to my site (thank you Steve from FoodJunk), I can formally apologize for the lack of material this winter. 

I did, in fact, take many of my winter recipes and translate them into the "points plus" system, and with a few minor tweaks, lost almost 35 lbs.  It would have been a fun winter exercise and great graffiti to launch a How To Journal, had it not been for too much work, and too little daylight. 

Many of you have complimented me on the photography, and while I can't take credit for the people shots, I do all of the food, projects, and stuff we love shots. 

The problem is I need daylight.  My camera, nor my skill, is good enough to compensate for lack of Daylight Saving Time.  At one point, I couldn't take a photo without a flash after 1:30pm, so that pretty much took care of any food shots.

Nevermind.  It's Spring, I have a few new posts, and I have lots of recipes and projects planned. (I don't plan the About Us stories, nobody could make stuff up.)

So, stay tuned for Grilled Artichokes, Pasta Primavera, Crab Cakes, Creamed Succotash, Best Burgers and Steaks, my Grandmother's Coleslaw, a new recipe I'm working on for Carnitas, Grilled Swordfish Sandwiches, Teriaki Pork Tenderloin, Asian Satay Coleslaw, Grilled Key West Shrimp Cocktail,  Grilled Jalapeno Poppers, Amatriciana, and whatever else I dream up with the new smoker and ice cream maker I got for Christmas.

Sunday
Jul292012

The Walk of the Fools

On most days in Italy, we would have the breakfast/morning meeting, when members of our group would discuss their plans for the day.  Several planned to take “the walk of the gods,” an off road trail that was about 10 miles long and a short, 2 hour drive away.  I decided to walk from the villa to a nearby trail that I would call, "the walk of the fools".  This trail was listed in the local guidebooks, and featured, among several points of interest, “the old wrecked car” 

Off I went. 

After battling the fiats for about a mile or so, I reached the entrance to the trail.  Once again, the trail was quite steep (read nearly vertical).  As it wound its way up (there’s that word again) the cliff. Unlike the other trail which went past a number of dwellings and on to the nearby town, this was rather remote in that you were pretty much in the middle of nowhere without a ceramic store in sight.  But it was clearly marked as it meandered up the cliffside. 

And there were interesting things to see along the way. 

Ruins of look-out towers built to watch for Saracen pirates 800 years ago.  A herd of mountain goats, along with the herder and her three dogs barking at me in Italian. 

Periodically, I would see a spent shotgun shell on the trail.  Seeing these made me think of a new meaning for the term “tourist season” 

Finally, there it was.  The highlights of the trail, the “old wrecked car.”  It was old.  It was wrecked.  And it was there. 

How did it get there?  It was akin to finding the wreck of a German U-Boat in somebody’s swimming pool in Kansas.  It was also at this point that the trail suddenly ended.  There were no more trail markers.  Maybe the guy making the trail ran out of paint. 

Or interest. 

Maybe that was his car. 

There was, however, once again, that ever so reassuring sign picturing the human skull and the warning in Italian.  Maybe this time is said, “No Parking.”

I'm looking down the cliffside, and directly below me I can see the Mediterranean, a cemetery (which probably contained the remains of several less fortunate hikers), a 747 coming in for a landing in Naples, and our villa.  There was, however, no direct way to get there.  Perhaps you had to get in “the old wrecked car” tune the radio to a specific frequency and receive instructions how to proceed.  But they would have been in Italian and of no use to me.

I turned around, hoofed the three miles I had come past the mountain goats, and instead, battled the Fiats.  I couldn’t wait to get back to the villa and “rehydrate.”

Sunday
Jan222012

Make Stock First

Why?

If you have stock, you can do pretty much anything with it.  And if you have homemade stock, your recipes will taste like they came out of a five star restaurant.  Because that’s the secret that makes anything a restaurant prepares taste better.  It’s what rock star chefs have their kitchen minions do for them:  make stock on a daily basis.

And, its free (or almost).  At least the way I make it.

I’ve tried nearly every commercially prepared stock out there.  There is a back flavor to each one of them that comes through the dish.  Don’t know if it is because it’s in a can, or box, or somewhere along the line, the recipe has some type of artificially concentrated flavoring or bouillion in it, but it’s there.  They also have a one-note complexity that, when combined with that back flavor and reduced makes for odd or bland tasting soups and sauces. 

So, here is my method for making stock.  Doesn’t really matter what kind it is. 

Meats, Fish, Shellfish, or Vegetables which are your primary flavor.  (but not all at once, please.)

I have found using cooked ingredients for this component works best.  There is an additional layer of flavor and complexity that comes from using something that has already been cooked.   I have seen recipes calling for a whole chicken or two to make stock.  Expensive.  The meat isn't really very good when it has been cooked this long.  And, I don’t like the taste.  It tastes raw or let’s face it, boiled.  Even though it’s poached or simmered.  Sorry Ina. 

Guess what?  That means you can use leftovers:

  • You can respectably ask for doggie bags in restaurants. 
  • You can, and you should, use all of those bones and scraps that were leftover from a chicken or roast you cooked.  Why not, you paid for them?
  • You can use the bones and scraps from anything out of the grocey store rotisserie.  You paid for those, too.
  • Ok, so don't use the bones you or your guests have knawed on.
  • Throw them in a bag and put them in the freezerJust remember to label what they are and put a date on them.  They stay for about 3 months.

I combine both pork and beef scrapes together for a general brown stock, chicken for chicken, turkey for turkey.  For seafood, the shells and any other fish scraps you have.  And for vegetable stock, I roast whatever I need first, or use any leftover roast vegetables.

For a batch of stock yielding about 3-4 quarts, you need at least the equivalent of bones from one chicken, 3-4 steak or chop bones.  In general, a pound or two of meat bones and scraps will suffice.  Use more if you have it, as long as you can fit everything into your pan.

Onions, Carrots, Celery and Garlic. 

YOU NEED ALL FOUR. 

I’ve tried to make stock when I was missing one.  Not good.  Not awful, but not balanced.   The good news is that when you have these items in your vegetable bin and they are a bit past their prime, just throw them in a bag in the freezer and use them for stock.   So:

  • One medium onion
  • Two stalks celery
  • Two medium carrots
  • Two whole garlic cloves

Just cut off the and root ends or wash to eliminate dirt, cut into a couple of pieces each, and throw them in the pot.  Put the garlic in whole.  See?  Easy.

Bay Leaf and Whole Black Pepper Corns. 

One or two Bay leaves and 8-10 peppercorns, whole.  Don’t know why these work, they just do.  It’s a balance thing again.  Just leave out the Black Pepper Corns if you are making a light stock, such as vegetable or fish or shellfish.

Water 

If you have good water coming out of your tap, use it.  If you don’t like the taste of water that comes out of your tap, you probably won’t like the taste of your stock (or your coffee).  So use what you would normally drink.  If that is a filtered source, out of your refrigerator or tap, or a $1.00 gallon bottle of spring water, any of those would work.

The How To

  • Put everything in a large pot.  Twelve quarts if you have one that big.  Cover with water (as much as you can fit). 
  • Bring to a boil, drop to the heat down to a slow boil, and let it go for two hours.
  • Strain ou the bones and vegetables and discard them.  You read right: dump them.  Do you really want to eat something that has been boiling for two hours?
  • Refridge in the pot overnight.  The next day, skim off the fat and freeze in 1 quart containers.  Fill an ice cube tray with whatever is left over.
  • Once the tray is frozen, remove the cubes to a plastic bag.

You may now begin cooking.

You will taste the difference in any soup, any braised dish, any chile, anything you make.  One or two of the cubes added to your gravy or pan sauté will make all of the difference in the world.

Monday
Jan022012

And Now, The Soup

It doesn't really matter what kind of soup I am making.  I make it the same way every time, and virtually in the same order, every time.  And when it comes time to decide what to do with leftovers, I know that if I have stock in the freezer, I can have soup made in less than an hour.  So, here are the basics to make any soup better, faster, cheaper.

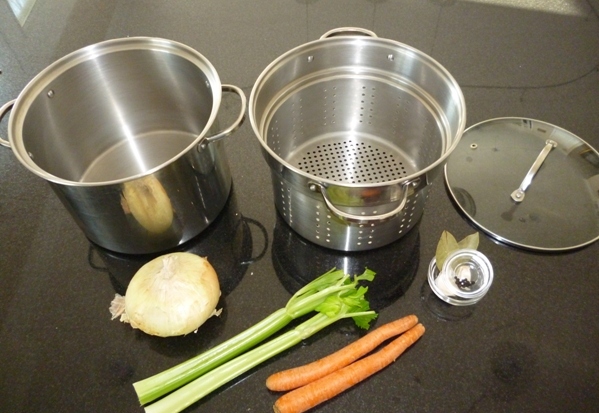
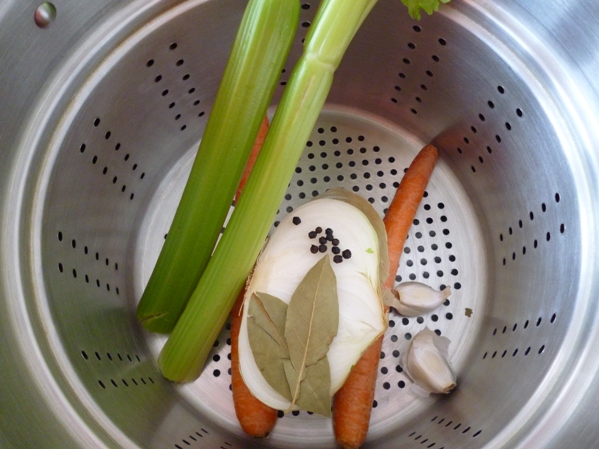
The day before:  Make the stock. 

Or, if you are clever little white witch, you will already have it made and in the freezer.  Take it out.

Chop the vegetables.

Unfortunately, I haven't found a gadget that makes this chore any faster.  Food processors don't work, particularly when it comes to onions.  So get yourself a good CHEFS knife and get chopping.

Most soup recipes will include onions, celery and garlic.  Sometimes carrots, sometimes peppers.  Those two tend to round out what is known as a mirapioux, or holy trinity, depending on where you are from.  I start chopping my vegetables in this order:

Garlic

I mince my garlic with a press.  I use a lot of it, and I want it to cook evenly and disperse throughout the dish.  If you want to smash it, and mince it by hand with your knife, have at it.

Onions

Cut the onions down the length, with the root end and the top end being where your knife cuts through. 

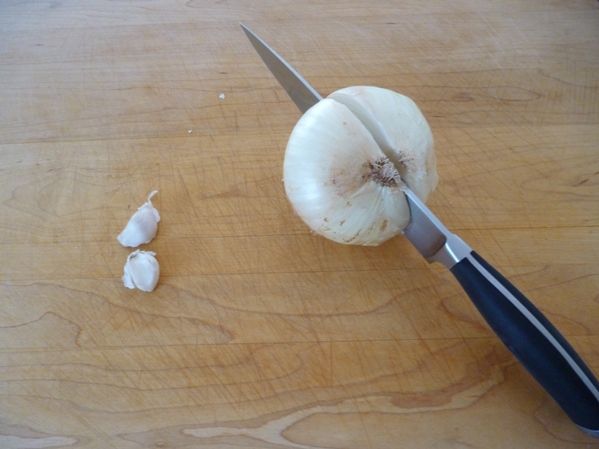
Then cut off the top end just enough to allow you to peel the onion skin back to where it will pull off at the root end. 


Lay the onion down on it's flat side, and holding it down by the root end, take the tip of your knife and follow the natural layers of the onion, cutting down to the board.

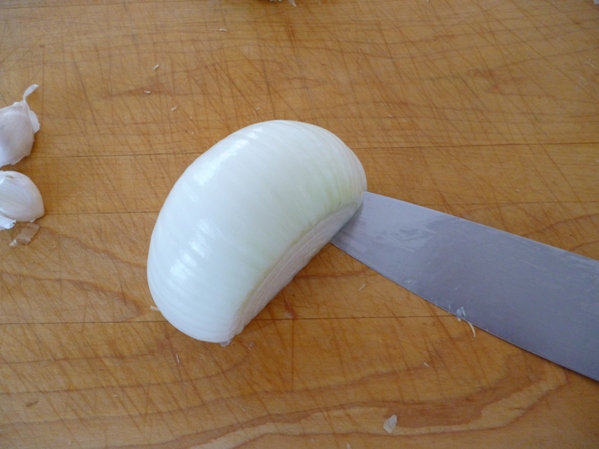
Keep cutting all around the sphere of the onion.

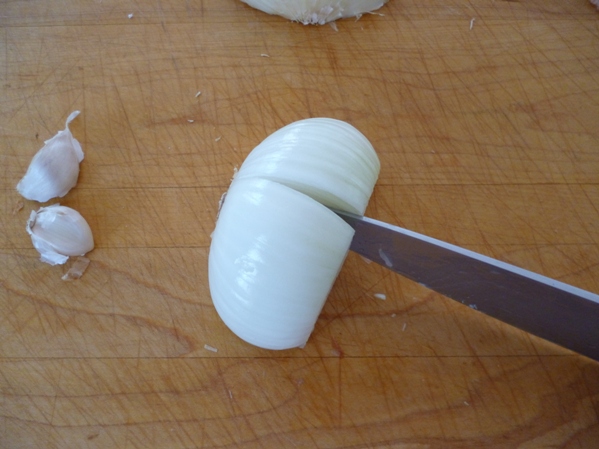
Now turn the onion and cut across the layers down to the board.  Most TV chefs show you a secondary cut horizontally into the onion before making the final cut down.  I have found there is no need to make this cut.

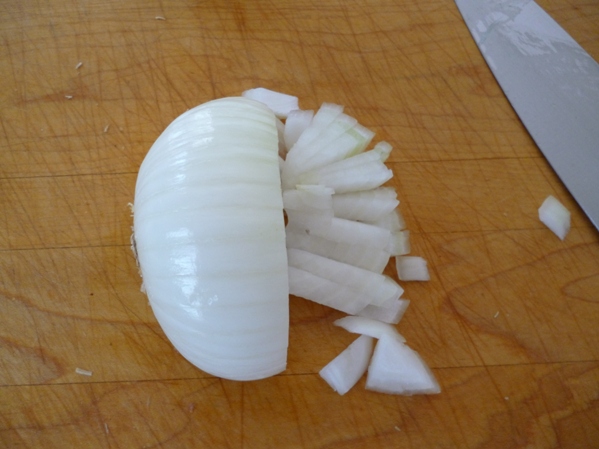
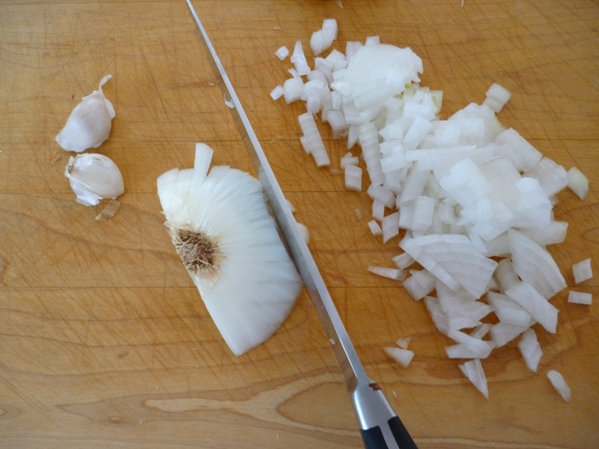
Once you get to the last 1/3 of the onion, turn it over onto the flat side again, and continue cutting until you are at the root end.  You should end up with a onion, with a small dice.
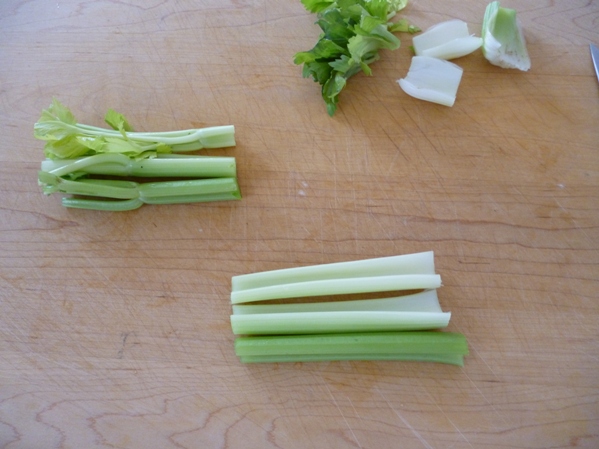
Celery

Wash the celery and cut off the root ends.  Cut off the tops just below where it branches off.  I use the middle hearts of the celery including the leaves, where it is very light green or yellow, for anything calling for raw celery.  It is full of flavor and aroma.  The outer leaves, on the other hand, are quite bitter, and I find them more suitable for cooking.

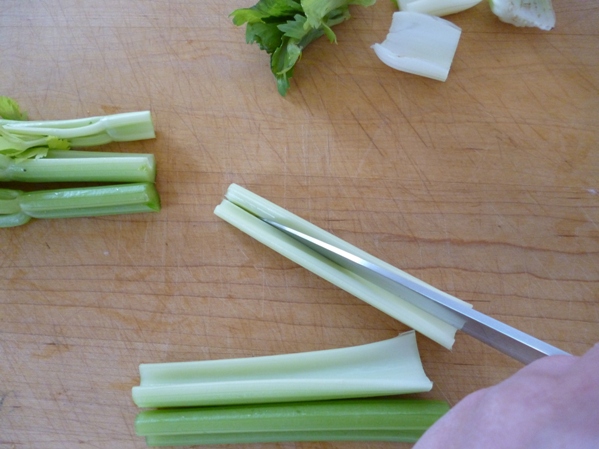
Cut the stalks in half again if you wish, then lay the stalk down on the round side, and using the tip of your knife, draw it from the root end all the want to the top end down to the board.  This will give you two relative flat pieces of stalk. 

Use the tip of the knife again to cut each of those two pieces in two again. 

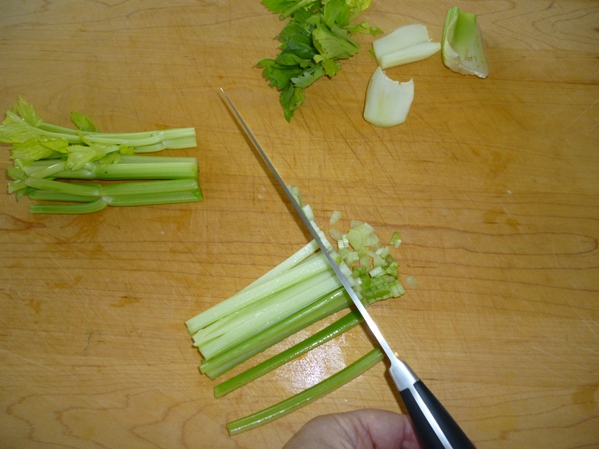
Now, holding as many of those fine stalks in a bundle as you can manage, finely dice them across the ends.  You should end up with a very finely diced pile of celery.

Carrots

Dice the carrots the same as you did the celery.  Place the carrot flat on the board and cut the end off.  Leave the top end on.  Lay your knife on top of the carrot lengthwise, and very carefully, press the entire knife down to the board.  Lay each of those pieces flat on the board, and cut them lengthwise again. 

Holding as many of those carrot stalks into a bundle as you can, cut them crosswise up to the root end.  You should have a small diced carrot. 

Peppers

Holding the pepper standing up, take the middle part of your chefs knife and cut straight down the side of the pepper.  This will cut the part you want away from the center core.  Continue with the other three sides. 

Putting the pepper strips skin side down on the board, run the tip of the knife down the pepper strip, cutting each piece into two or three strips, depending on the size of the pepper. 

Holding as many of these strips into a bundle as you can manage with one hand, cut crosswise until a dice.  You should have a small diced pepper.

Start cooking your vegtables in fat

Whatever your recipe calls for, bacon, salt pork, butter, oils, get that into a large 6-7 quart dutch oven, over medium high heat.

While it is heating, bring the garlic and the onions close to your pan.  When the fat just begins to smoke, put the garlic in the pan, and immediately stir it around evenly in the fat, until it just starts to color. 

Immediately add your onions to the pan.  Spread them around and get the garlic mixed it.  You don't want to walk away from your garlic ever, as it burns very quickly. 

Now, start your patience.  The process of cooking these vegetables can take up to 30 minutes, depending on how dark you want your soup, and how much you are trying to cook at one time.  Let the onions sit for at least 5 minutes without moving them.  As you see the edges start to color, give them a good stir.  Now wait another 5 minutes, and stir them again. 

Now add the celery, stir it in, and give it five minutes.  Stir again.

Now add the remaining vegetables, typically carrots or peppers.  Carrots don't really need to saute, they will end up cooking in the broth.  Peppers I like to get some color on, so let them saute a bit before going to the next step.

Season.  Now. 

With salt and pepper, and with whatever herbs or spices your recipe calls for.  Allowing these flavors to saute in the fat cooking the vegetables is what will impart their flavor throughout the dish.  They just need a minute or two.

Add the liquid. 

Sometimes this is just stock, sometimes it will include canned tomatoes. 

  • If you are going to puree the vegetables to make a bisque, add the tomatoes, and only about 1 quart of the stock. 
  • If you are not doing a puree, add all but about 1 quart of your stock.  Bring everything to a boil and cook until all of the vegetables are tender.

I use a boat motor to puree.  I have found this the most useful tool in my kitchen, the easiest to use, and the easiest to clean up after.  Worth the investment.  At this stage, puree your vegetables until you have the consistancy called for in the recipe.  Then add the remaining stock, leaving a quart or so at the end to adjust the consistancy if necessary.  You can always add stock, but if your puree is too thin, you'll have to chop and cook more vegetables and that's not fun.

Thickening Methods:

If you are going to do any further thickening, this is the time to do it.  Whether your recipe calls for cornstarch, a flour slurry, or a butter and flour roue this is the time to add it to the liquid. 

Whatever the recipe calls for, I take the dry ingredient in a cup or bowl and slowing add the liquid ingredient, using a small spatula or wisk.  If it's a rouge, it need not be cooked.  Just mix one tablespoon soft butter with one tablespoon flour with your fingertips until you get a paste.  If it's flour and water, add the water slowly and mix into a thick paste, then add more water to loosen it into a slurry.  You will avoid lumps this way.

Let the soup get some body to it.  Allow the thickening agents time to work.  Keep it on a simmer for about 10 minutes.  Taste and adjust your seasoning.

Add the Meat

I use mostly cooked meats for soup.  Left over chicken, roast pork, sliced beef, all can be shredded and added at this point.  You only need to heat them through.

So the next time you see a recipe for a soup you want to try, read through the ingredients and skip the part where it says, "add one can chicken stock."